Today we are going to set up the first node of the homelab.
I got some hardware and would like to turn it into a private DNS server, DHCP server (due to my router’s limitations) and a reverse proxy to have a routing solution for the internal services on URL basis instead of IP addresses. For the DNS / DHCP / AdBlocker we will use PiHole, for reverse proxy Traefik and we will put it there as Docker containers. Of course there will be a twist, namely Infrastructure As Code, because that’s what we are doing here. :)
This will be a two-part article. Today we will tackle the platform setup by installing the OS, Docker and preparing the automation that could help us get to that point from a bare install whenever we would like to. In the second article, which should arrive shortly after, we will tackle the services.
- Hardware
- Operating System
- Software Overview
- (Theoretical) Manual Setup
- Infrastructure As Code Approach
- Summary
Hardware
I chose Dell Wyse 3040 as my device of choice for this project. It is a thin client used typically to connect to Virtual Desktop Infrastructure - a gateway to a much more powerful computer somewhere on the server.

Here are the specifications:
- CPU: Intel Atom x5-Z8350 (quad core 1.44GHz)
- Memory: 2GB DDR3L 1600MHz
- Storage: 16GB eMMC FLASH - there are also models with 8GB so be mindful while searching
- Input/Output: 3xUSB2.0, 1xUSB3.1, Audio-mic combo jack, 2xDisplayPort1.2 (no HDMI!), 1x1Gbps RJ45 (Ethernet)
It is not powerful, but it’s power is plenty for what we are trying to achieve. Its weakness is also a big advantage for the always-on node due to its very low power consumption.
Direct competitor to this device could be a Raspberry Pi 4 / 5 which is worse in my opinion due to a couple of things:
- Raspberry Pi has an ARM-based CPU and Wyse got one in x86_64 architecture which extends our docker container’s options broadly
- Raspberry Pi is much more costly right now. Pi 4B with 2GB RAM is around 50EUR where I live and that is for the board only. On top of that you need to add an SD card, a power cable and a case. I got Wyse for around 35EUR used with all the stuff included
- eMMC storage is more resilient than SD cards (but is not expandable unfortunately)
Operating System

The Operating System (OS) is the layer through which we operate on the system (duh!). There are many great Linux distributions that you could put on such a slick boy but I am sticking with the classic - Ubuntu Server 24.04.4 LTS due to standardization across the whole homelab. Plus that’s what they are using on Certified Kubernetes Administrator exam.
Flash The Drive
Get yourself a pendrive and let’s start working towards your new server.
Go to Ubuntu Server’s page and download the installer.
While it is downloading think of which flasher you would like to use. There are a couple nice ones on the market like Rufus, Balena Etcher or Ventoy. The last one is notable due to its ability to store multiple ISO files on the drive, so during the initial boot you can choose what you want. The rest of them are standard - one pendrive - one OS ISO.
Whichever flasher you choose - proceed with the instructions and create a bootable pendrive with our Ubuntu Server ISO.
Install
Before you insert the pendrive turn on the device and go to UEFI (newer) / BIOS (older - but I will stick with using UEFI in the write-up) menu. Probably you will need to spam one of the F-keys during boot to get there. I needed to do so with F2 - please look online what is it for yours.
Most probably in the Boot section of UEFI you will find Secure Boot. While needed for Windows, for Linux you can (and should) disable it. While you are there look if you have USB boot enabled. If so, insert the bootable pendirve, save the changes and reboot.
Now we need to get to the boot menu, so again mash those F-keys (F12 for me) until you get there. If you are using Ventoy select Ubuntu Server from the list.
Let’s get installing!
Controls here are:
[Arrows] to move around
[Space] to tick boxes
[Enter] to confirm
-
Click Try or install. It will wait for a cloud-init file but that is not what we are doing now. Feel free to explore though!
-
Select language
From dropdown select English
- Keyboard layout
From dropdown select your keyboard layout. If you are unsure go with English US.
[Done]
- Choose the type of installation
- Ubuntu Server
- Ubuntu Server (minimized)
Additional options
- Search for third-party drivers
[Done]
- Network configuration
Select the interface - typically eth if you connected via an ethernet cable.
Edit IPv4 - Manual
As this will serve me as a DHCP server I need that manual IP there. If you will have DHCP served from elsewhere feel free to use Automatic (DHCP) as the setting here. Just make sure to make an IP reservation.
Subnet: 192.168.1.0/24 - in a CIDR notation
Address: 192.168.1.3 - my server’s IP (take note of that)
Gateway: 192.168.1.1 - gate to the Internet, typically the router’s IP
Name servers: 1.1.1.1,1.0.0.1 - DNS servers. IPs there are Cloudflare’s until we set up our DNS
Search domains: -
Edit IPv6 - Disable.
[Done]
- Proxy address
Leave it empty if you don’t know what to put there and if you know - you know :)
[Done]
- Mirror address
It will be automatically appointed based on your locale. Wait for the test to finish and click [Done] if successful. If not then review your network connectivity.
- Guided storage configuration
- Use an entire disk
From the dropdown select your disk. In my case it is [0x8bc9f432] 14.675G as Wyse has only 16GB. Ubuntu tried to install on my 32GB pendrive as default.
-
Set up this disk as an LVM group - while LVM has its advantages it will not be beneficial to me on such a small, singular device - I advise you to do the same for a first homelab install
-
Custom storage layout
[Done]
- Storage configuration
Review the settings and click [Done].
“Confirm destructive action” pop-up will come up. That’s what we are here for.
[Continue]
- Profile configuration
Your name: Admin’s name. albert for me, could be John Doe for you.
Your server’s name: Your server’s name. ubu-wysebaba (naming convention, ubu for OS and then name after dash)
Pick a username: Admin’s username. albert for me, but typically you could see ubuntu or admin. I don’t recommend going that route though as those are pretty common and will be an anhor for brute-force attack if you ever make that server visible to the public Internet, even by a mistake.
Choose a password: ********** :)
Confirm your password: **********
[Done]
- Upgrade to Ubuntu Pro
- Skip Ubuntu Pro setup for now
[Done]
- SSH Configuration
- Install OpenSSH server - this will be our gate to the server.
[ Import SSH key ] - you can read about it, I will skip it for now.
[Done]
- Third-party drivers
[Continue]
- Featured server snaps
Let’s skip those for now. We will be installing our software ourselves.
[Done]
… and now, we wait.
After the installation finishes click [Reboot Now].
You will be prompted to remove installation medium -> disconnect the pendrive and click [Enter].
TADA!
You have the server up and running. You can use the command line logging in with your username and password. But that’s not something we will be doing - this one is meant to work headless so we can remove the screen cable and the keyboard and even place the device on the shelf with only the ethernet and power cables attached.
Now go back to your computer and let’s start with checking the SSH connection. I will be putting real values used by me in the comment next to the command.
ssh <user>@<ip> # albert@192.168.1.3
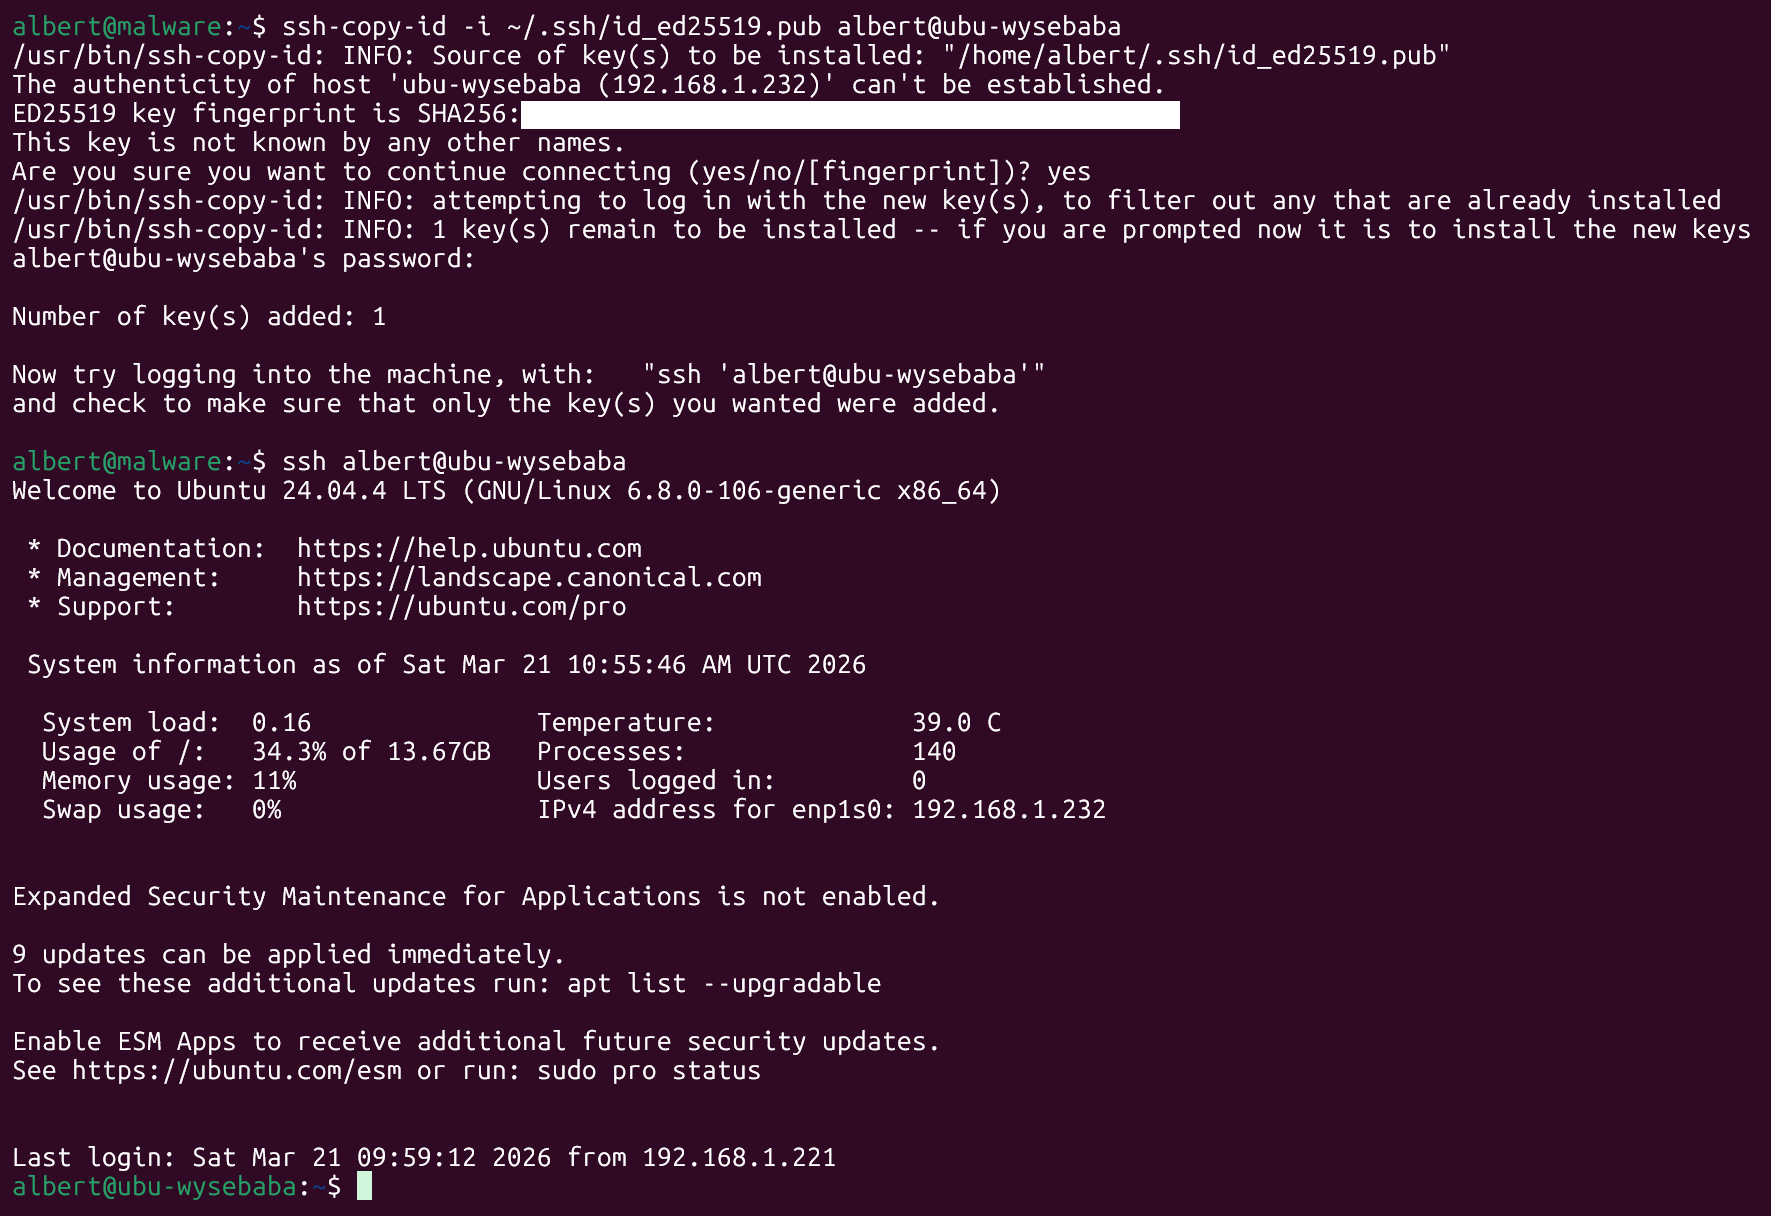
You will be prompted for a password and to add the server to known_hosts - agree to it.
Once you verify you can login let’s do one more manual step before going into setup. Typically this one would be covered by cloud-init or Terraform as well but for the sake of this article I would like to keep it simple. We will generate the encrypted keys for our server so we can use that instead of password authentication. Plus they will be used for the initial setup of the server by Ansible.
Keys
Generate the keys on your machine.
ssh-keygen -t ed25519 -C "meaningful comment" # ssh-keygen -t ed25519 -C "albert@mypc"
And now we need to add it to authorized_keys on the server. Here is a one-liner:
ssh-copy-id -i <path_to_public_key> <user>@<ip> # ssh-copy-id -i ~/.ssh/id_ed25519.pub albert@192.168.1.3
You can now login via ssh without providing the password. Not to mention it is much safer that way. :)
Software Overview
So what are we going to put on there?
In the introduction I mentioned PiHole, Traefik and a container daemon which is Docker. As we are tackling the infrastructure part first, let’s focus on the Docker from this bunch. Plus we will need to keep in mind the IAC. For the brief introduction I would point you to my last article: “Homelab As Code, Kid!”.
Docker - Containers’ Layer
Docker is an open platform for developing, shipping, and running applications. Docker enables you to separate your applications from your infrastructure so you can deliver software quickly. With Docker, you can manage your infrastructure in the same ways you manage your applications. By taking advantage of Docker’s methodologies for shipping, testing, and deploying code, you can significantly reduce the delay between writing code and running it in production.
Long story short it is a virtualization layer that will run small Linux applications on top of an exisitng Linux system. Some people push it as “desktop apps” or “server apps”. The reality is a little bit more complicated but on a high level it is a good abstraction.
It is worth mentioning Docker Compose, a tool that helps define the “run” part of the container on your machine. We will be defining those compose files later in the article.
Official documentation: https://docs.docker.com/
Worth taking a look at this too there: What is docker? by Docker Inc.
How Does It Look Like?
Here I prepared a simple drawing of the whole setup that we will introduce in this two-part series.
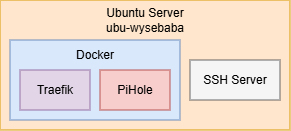
This is a very simplified drawing but should give you an overall picture of what is coming.
(Theoretical) Manual Setup
Alright, so what would we need to set up this homelab node manually? It is always good to understand what needs to be done first before automating it. To not clutter our new server I created a virtual machine on my hypervisor (Proxmox) server named ubu-testbaba so we can get the real deal here. Don’t worry I will show you that too at some point. :)
We already have fully operational server with OS and SSH connection. Let’s review what else might be needed on the bare metal. From now I assume we are logged into the node. In case you forgot:
ssh <user>@<ip> # albert@192.168.1.3
Packages
Before we install anything it would be good to update the system. In case of Ubuntu we will use apt package manager to do so.
sudo apt update && sudo apt upgrade -y
Run it, put your admin password in and wait until it finishes the update. Once we are done we can move to assessing which packages could be useful. Here is a list of suggestions:
- git - should be preinstalled. This will allow you to use git on the system. Could be useful to clone your repository from GitLab (or other provider). We will not be doing edits to the code on the server itself - this belongs to your development workstation.
- curl - should be preinstalled. This is a commandline tool to download files from the Internet.
- jq - should be preinstalled. This is a comand line tool to process JSON files. A lot of configurations are distributed that way.
- htop - should be preinstalled. A nice command line Task Manager so you can see what is running and what consumes most resources.
- tree - a tool to show you the directory structure in a tree.
- make - Makefile support.
- python3-pip - Python package manager.
- ufw - should be preinstalled. Uncomplicated FireWall. Does what it says on the tin. A server-side firewall is a good addition to any server.
- fail2ban - tool that monitors logs in the background and modifies firewall rules automatically. Could prevent the brute-force attack on the server if it recognizes mutliple failed attempts to log in.
- acl - Access Control List. Tool to setup detailed permissions on files.
- neovim - my favourite command line editor. Direct successor of vi and vim. You should probably at least learn basics of its usage as vi is typically the only text editor available to you on an enterprise Red Hat server. Here is a nice tutorial: https://vim-adventures.com/.
When you decide what to install and what not to you run this command. Remove the packages that you don’t want from the line.
sudo apt install git curl jq htop tree make python3-pip ufw fail2ban acl neovim -y
The nice thing about the package manager is that it will take care of the dependencies for you.
Docker
Installing Docker
Docker provides a more detailed way to install it that you can find here and a simple one-liner that will run a script doing the same. curl will download the script and sh will take care of execution.
curl -sSL https://get.docker.com | sh
At the end you will see a nice prompt like:
================================================================================

To run Docker as a non-privileged user, consider setting up the
Docker daemon in rootless mode for your user:

    dockerd-rootless-setuptool.sh install

Visit https://docs.docker.com/go/rootless/ to learn about rootless mode.


To run the Docker daemon as a fully privileged service, but granting non-root
users access, refer to https://docs.docker.com/go/daemon-access/

WARNING: Access to the remote API on a privileged Docker daemon is equivalent
         to root access on the host. Refer to the 'Docker daemon attack surface'
         documentation for details: https://docs.docker.com/go/attack-surface/

================================================================================
It is a good practice to run the mentioned script so the Docker doesn’t have root privileges. Unfortunately it can also cause some configuration headaches, especially with the services that need to run as privileged, like DHCP or DNS. I am choosing to not run it but as always - feel free to explore.
To test if Docker was installed correctly run:
sudo docker run hello-world
Hello from Docker!
This message shows that your installation appears to be working correctly.

To generate this message, Docker took the following steps:
 1. The Docker client contacted the Docker daemon.
 2. The Docker daemon pulled the "hello-world" image from the Docker Hub.
    (amd64)
 3. The Docker daemon created a new container from that image which runs the
    executable that produces the output you are currently reading.
 4. The Docker daemon streamed that output to the Docker client, which sent it
    to your terminal.

To try something more ambitious, you can run an Ubuntu container with:
 $ docker run -it ubuntu bash
Once you have made sure it is installed, let’s proceed with post-install steps.
Post-install Steps
Official documentation: https://docs.docker.com/engine/install/linux-postinstall/
Create the docker group and add our admin user to that. It will allow to not use sudo in the future to operate on Docker.
sudo groupadd docker && sudo usermod -aG docker $USER
Restart the server or your shell session now for the changes to be applied. The last step is to enable Docker automatically on server boot. You don’t want to have the services there and log in every time the plug is pulled to start them again.
sudo systemctl enable docker.service
sudo systemctl enable containerd.service
“That’s it folks!” - Bugs Bunny
Infrastructure As Code Approach
We know what needs to be done. Now it is high time to automate it!
Here is the repository structure that I would suggest. It will be mostly empty for now, but during our sessions we will grow into it.
.
├── Makefile
├── ansible
│   ├── inventory
│   │   ├── group_vars
│   │   │   └── all.yml
│   │   └── hosts.yml
│   ├── playbooks
│   │   ├── bootstrap-ansible-user.yml
│   │   └── setup-system-1.yml
│   └── roles
│       ├── common
│       │   ├── defaults
│       │   │   └── main.yml
│       │   └── tasks
│       │       └── main.yml
│       └── docker
│           └── tasks
│               └── main.yml
├── ansible.cfg
└── docs
    └── 00-infrastructure.md
Also… there is a public repository with all the code that we will be using for the homelab. You can find it here: Homelab As Code, Kid!. Feel free to use it as a guidance. The main branch will hold the newest version, but you can always refer to branch with the name of the article, like article/03-wyse-decision-1-os in this case.
As we have set up the server manually we will use Ansible mainly for the post-install configurations that we’ve done so far.
The starting point will be the freshly installed server with our admin user and SSH connection via password and a static IP Address.
To configure anything we will need the tools. Go shopping and install yourself Python, Ansible and Make (if you want to utilize the Makefile).
- Create hosts file
If we are to use Ansible first prepare a list of systems that it will be used against. This time it is only one, but surely the list will grow. I will add a file path in the first comment of the file to ease you a bit with pathfinding. The "./" represents the current directory, which I will assume is the root directory of the project.
# ./ansible/inventory/hosts.yml
---
all:
  children:
    metal:
      hosts:
        system-1: # ubu-wysebaba
          inventory_host: hostname-1 # ubu-wysebaba
          ansible_host: ip-1 # server's ip
You can use any of the headers as a grouping method or just refer to the system.
Now, let’s see it in action. We can try pinging the server to verify that the information we put in there is correct. –ask-pass and –ask-become-pass flags will cause the Ansible to get the password from you interactively. Just make sure to put in there the password that was set for admin user on the server, not your PC.
ansible system-1 -m ping -i <inventory_path> -u <admin_user> --ask-pass --ask-become-pass # ansible ubu-wysebaba -m ping -i ./ansible/inventory/hosts.yml -u albert --ask-pass --ask-become-pass
You should see something like this:
system-1 | SUCCESS => {
    "changed": false,
    "ping": "pong"
}
- Create default variables
This will need to be set up in two places. First (all.yml) is near the hosts file and will serve as a storage for your public keys (for now at least) and some variables that you can refer to in Ansible playbooks. Plus you will be able to separate some variables depending on the host’s category. Second one (ansible.cfg) is a set of default values that will be used if you do not provide any overwrites.
# ./ansible.cfg
[defaults]
inventory         = ansible/inventory/hosts.yml # inventory file path
roles_path        = ansible/roles               # roles path
remote_user       = ansible                     # which user to use to connect
private_key_file  = ~/.ssh/ansible_ed25519      # path to remote_user's private key
host_key_checking = False                       # do not check host key agains known_hosts

[privilege_escalation]
become_method = sudo

[connection]
pipelining = True # reduces amount of connections if possible
# ./ansible/inventory/group_vars/all.yml
---
admin_user: admin_username # make sure to put your login here
ansible_service_user: ansible
ansible_ssh_private_key_file: ~/.ssh/ansible_ed25519
ansible_python_interpreter: /usr/bin/python3

# ssh keys to add to each host
admin_ssh_public_keys:
  - name: "name 1"
    key: "public key 1"
    state: present
  - name: "name 2"
    key: "public key 2"
    state: present

ansible_ssh_public_keys:
  - name: "name 1"
    key: "public key 1"
    state: present
  - name: "name 2"
    key: "public key 2"
    state: present
- Prepare the key for ansible user
We don’t want to run the configurations from our user. It messes the logs a bit. We will create an ansible user during our bootstrap but we will need a key for it! The process is very similar to creating the personal key - the only changes will be the name and the purpose. Once generated add the key to the ansible/inventory/group_vars/all.yml. Your personal public key goes to admin_ssh_public_keys and ansible’s goes to ansible_ssh_public_keys. Those will be added to authorized_keys on the server via the playbook.
ssh-keygen -t ed25519 -C "meaningful comment" -f <path> # ssh-keygen -t ed25519 -C "ansible@mypc" -f ~/.ssh/ansible_ed25519
- Create bootstrap user playbook
First playbook time! We want to be able to connect to the system via SSH keys, right? Right. We also want a separate ansible user to run the playbooks later.
# ./ansible/playbooks/bootstrap-ansible-user.yml
- name: Bootstrap ansible user
  hosts: all
  remote_user: "{{ admin_user }}" # use admin user to connect, we defined him in group_vars
  become: true # get sudo

  tasks:
    - name: Add SSH keys for admin user
      ansible.posix.authorized_key:
        user: "{{ admin_user }}"
        key: "{{ item.key }}"
        state: "{{ item.state }}"
        comment: "{{ item.name }}"
      loop: "{{ admin_ssh_public_keys }}" # iterate over the list of keys

    - name: Create ansible service user
      ansible.builtin.user:
        name: "{{ ansible_service_user }}"
        shell: /bin/bash
        create_home: true
        state: present

    - name: Add SSH keys for ansible user
      ansible.posix.authorized_key:
        user: "{{ ansible_service_user }}"
        key: "{{ item.key }}"
        state: "{{ item.state }}"
        comment: "{{ item.name }}"
      loop: "{{ ansible_ssh_public_keys }}"

    - name: Configure passwordless sudo for ansible
      ansible.builtin.lineinfile:
        path: /etc/sudoers.d/{{ ansible_service_user }}
        line: "{{ ansible_service_user }} ALL=(ALL) NOPASSWD:ALL"
        create: true
        mode: "0440"
        validate: "visudo -cf %s"

    - name: Mark node as bootstrapped # just for fun really :)
      ansible.builtin.file:
        path: /home/{{ ansible_service_user }}/.bootstrapped_by_ansible
        state: touch
        mode: "0644"
And if you are feeling like it create an entry in the Makefile. It will be the command that we will be using.
# ./Makefile
# Bootstraps
bootstrap-ansible-user:
	ansible-playbook ansible/playbooks/bootstrap-ansible-user.yml \
	-i ansible/inventory/hosts.yml --ask-pass --ask-become-pass
Now we can use it with either the full Ansible command that you see defined above:
ansible-playbook ansible/playbooks/bootstrap-ansible-user.yml -i ansible/inventory/hosts.yml --ask-pass --ask-become-pass
Or the make command:
make bootstrap-ansible-user
- Create common role
Roles in Ansible are reusable instructions that you can refer in your playbooks. As we are moving with standardized systems let’s create a common role. It will install required packages, make sure they are up to date and update public keys on the server if they change.
# ./ansible/roles/common/defaults/main.yml
---
base_packages: # list of packages that we want on every node
  - git
  - curl
  - jq
  - htop
  - tree
  - make
  - python3-pip
  - ufw
  - fail2ban
  - acl
  - neovim
# ./ansible/roles/common/tasks/main.yml
---
- name: Update apt cache # update the packages cache in apt
  ansible.builtin.apt:
    update_cache: true
    cache_valid_time: 3600

- name: Install base packages
  ansible.builtin.apt:
    name: "{{ base_packages }}"
    state: present

- name: Check and update SSH keys for admin user
  ansible.posix.authorized_key:
    user: "{{ admin_user }}"
    key: "{{ item.key }}"
    state: "{{ item.state }}"
    comment: "{{ item.name }}"
  loop: "{{ admin_ssh_public_keys }}"

- name: Check and update SSH keys for ansible user
  ansible.posix.authorized_key:
    user: "{{ ansible_service_user }}"
    key: "{{ item.key }}"
    state: "{{ item.state }}"
    comment: "{{ item.name }}"
  loop: "{{ ansible_ssh_public_keys }}"

- name: Configure UFW default deny # enable firewall and deny everything incoming. We will need to remember that anytime we setup additional service, but it will keep us more secured
  community.general.ufw:
    state: enabled
    policy: deny
    direction: incoming

- name: Allow SSH through UFW # allow incoming ssh connection
  community.general.ufw:
    rule: allow
    port: 22
    proto: tcp
- Create docker role
Our services will be running on Docker, so we will need it set up on the server. Not every server we will be setting up will have docker - that is the reason to put it in a separate role.
# ./ansible/roles/docker/tasks/main.yml
---
- name: Install Docker dependencies
  ansible.builtin.apt:
    name:
      - ca-certificates
      - curl
      - gnupg
    state: present

- name: Add Docker GPG key
  ansible.builtin.apt_key:
    url: https://download.docker.com/linux/{{ ansible_distribution | lower }}/gpg
    state: present

- name: Add Docker repository
  ansible.builtin.apt_repository:
    repo: "deb [arch=amd64] https://download.docker.com/linux/{{ ansible_distribution | lower }} {{ ansible_distribution_release }} stable"
    state: present

- name: Install Docker
  ansible.builtin.apt:
    name:
      - docker-ce
      - docker-ce-cli
      - containerd.io
      - docker-compose-plugin
    state: present
    update_cache: true

- name: Add admin user to docker group
  ansible.builtin.user:
    name: "{{ admin_user }}"
    groups: docker
    append: true

- name: Enable and start Docker
  ansible.builtin.systemd:
    name: docker
    enabled: true
    state: started
- Tie it all together in a setup playbook
Now we have all the pieces to build the infrastructure. Let’s create the initial version of our setup playbook. It will grow once we add the services but it cannot be empty. There comes a dummy task with a debug print. :)
# ./ansible/playbooks/setup-system-1.yml
- name: Setup system-1 node
  hosts: system-1
  become: true
  roles:
    - common
    - docker

  tasks:
    - name: Print if success
      ansible.builtin.debug:
        msg: "You are running on {{ ansible_distribution }}"
And like previously we can ease our typing a bit with an addition to Makefile.
# ./Makefile
# Setups
## system-1
setup-system-1:
	ansible-playbook ansible/playbooks/setup-system-1.yml \
	-i ansible/inventory/hosts.yml
We are not adding –ask-pass as we have the keys to ansible user already there. We also skip –ask-become-pass because we configured ansible user to have passwordless sudo.
Now you should be able to log in to the server without providing the password and run docker commands.
# from your PC
ssh <user>@<ip> # ssh albert@192.168.1.3

# on the server
docker run hello-world
Hello from Docker!
This message shows that your installation appears to be working correctly.

To generate this message, Docker took the following steps:
 1. The Docker client contacted the Docker daemon.
 2. The Docker daemon pulled the "hello-world" image from the Docker Hub.
    (amd64)
 3. The Docker daemon created a new container from that image which runs the
    executable that produces the output you are currently reading.
 4. The Docker daemon streamed that output to the Docker client, which sent it
    to your terminal.

To try something more ambitious, you can run an Ubuntu container with:
 $ docker run -it ubuntu bash

Share images, automate workflows, and more with a free Docker ID:
 https://hub.docker.com/

For more examples and ideas, visit:
 https://docs.docker.com/get-started/
Summary
We are done with the infrastructure. We went through the installation of the Operating System, did a little deep dive into manual configuration to understand the automation process and at the end automated the whole setup.
In the second part we will add the services and make use of our tiny server. Until then - take your time to understand the process, read the documentation and fix all the bugs that you encounter.
Most importantly - HAVE FUN!