Having one system under your control is fun. Having multiple is even better. Having multiple (virtual) systems on your multiple systems is just another level.
To ascend in the homelab space you WANT to have the latter and I am here to bootstrap you for the futro… I mean future. With a hypervisor. Your own. On your own hardware.
Hardware - Fujitsu Futro S920

As you probably guessed the magical Futro is some kind of a motif today. Fujitsu Futro S920 to be precise.
Like before with Dell Wyse 3040 I got it for cheaply second-hand. It is again an industrial terminal that got discarded from some factory after being used near a production line. This veteran was given a second life in my homelab and I must say it is a pretty capable machine.
Here are the specifications - how I bought it (for as low as 32EUR):
- CPU: AMD GX-424CC (2.40 GHz, Quad Core) - strongest one in the model
- GPU: AMD Radeon™ R5E
- Memory: 8GB (2x4GB) DDR3L 1600MHz
- Storage: 7GB mSATA
- Input/Output: 4xUSB2.0 (back), 2xUSB3.0 (front), Audio-mic combo jack, 1xDisplayPort (no HDMI!), 1xDVI-I, 1x1Gbps RJ45 (Ethernet), 2xRS-232, 2xPS/2 (mouse/keyboard)
- Additional: WiFi card, SmartCard reader
And here after my upgrades:
- CPU: AMD GX-424CC (2.40 GHz, Quad Core)
- GPU: AMD Radeon™ R5E
- Memory: 16GB (2x8GB) DDR3L 1600MHz - max supported by the CPU
- Storage: 128GB mSATA
- Input/Output: 4xUSB2.0 (back), 2xUSB3.0 (front), Audio-mic combo jack, 1xDisplayPort (no HDMI!), 1xDVI-I, 1x1Gbps RJ45 (Ethernet), 2xRS-232, 2xPS/2 (mouse/keyboard)
- Additional: both disconnected
Proxmox Virtual Environment
Link: Proxmox Virtual Environment
Proxmox Virtual Environment is a complete, open-source server management platform for enterprise virtualization. It tightly integrates the KVM hypervisor and Linux Containers (LXC), software-defined storage and networking functionality, on a single platform. With the integrated web-based user interface you can manage VMs and containers, high availability for clusters, or the integrated disaster recovery tools with ease.
Compute, network, and storage in a single solutionThe enterprise-class features and a 100% software-based focus make Proxmox VE the perfect choice to virtualize your IT infrastructure, optimize existing resources, and increase efficiencies with minimal expense. You can easily virtualize even the most demanding of Linux and Windows application workloads, and dynamically scale computing and storage as your needs grow, ensuring that your data center adjusts for future growth.
Long story short - it is a Debian-based system which will handle virtualization for you.
Installation
Download the latest image from Proxmox Website and make a bootable USB drive. If you need any guidance, check out the previous blogpost where we were installing Ubuntu Server.
- End User License Agreement (EULA)
Read the EULA carefully. It’s always important to know what you are signing up for. Of course I read it, why are you asking? :)
[I agree]
- Proxmox Virtual Environment
Here we will select the install disk. For me it is /dev/sda.
[Next]
- Location and Time Zone
Select your country, time zone and keyboard layout.
[Next]
- Administration Password and Email Address
Set the password and confirm it. This will be your root password from now on (until you change it of course). Add an email, if possible - a real one. Without any additional config ProxmoxVE shouldn’t send you notifications, but still…
[Next]
- Management Network Configuration
We are almost done. Networking is next.
Management Interface - select the wired one, not Wi-Fi as Proxmox does not support wireless connections (by default). This is for a good reason. It is meant to be a hypervisor on which other systems will depend, so it needs a stable network connection.
Hostname (Fully Qualified Domain Name) - select something of your own - pve-futroniko.home for me
IP Address (CIDR) - I am putting something in my subnet, but outside the DHCP scope. 192.168.1.10/24 should be good.
Gateway - your router’s IP, probably 192.168.1.1
DNS server - if you have set up a PiHole like in the articles before it will be its IP, otherwise you can select your router’s.
Leave the rest as default.
[Next]
After a while you should get a fully operational hypervisor to customize to your liking. You can reach it under its IP address, port 8006 in the web browser. Login is root and password is your own.
Welcome!
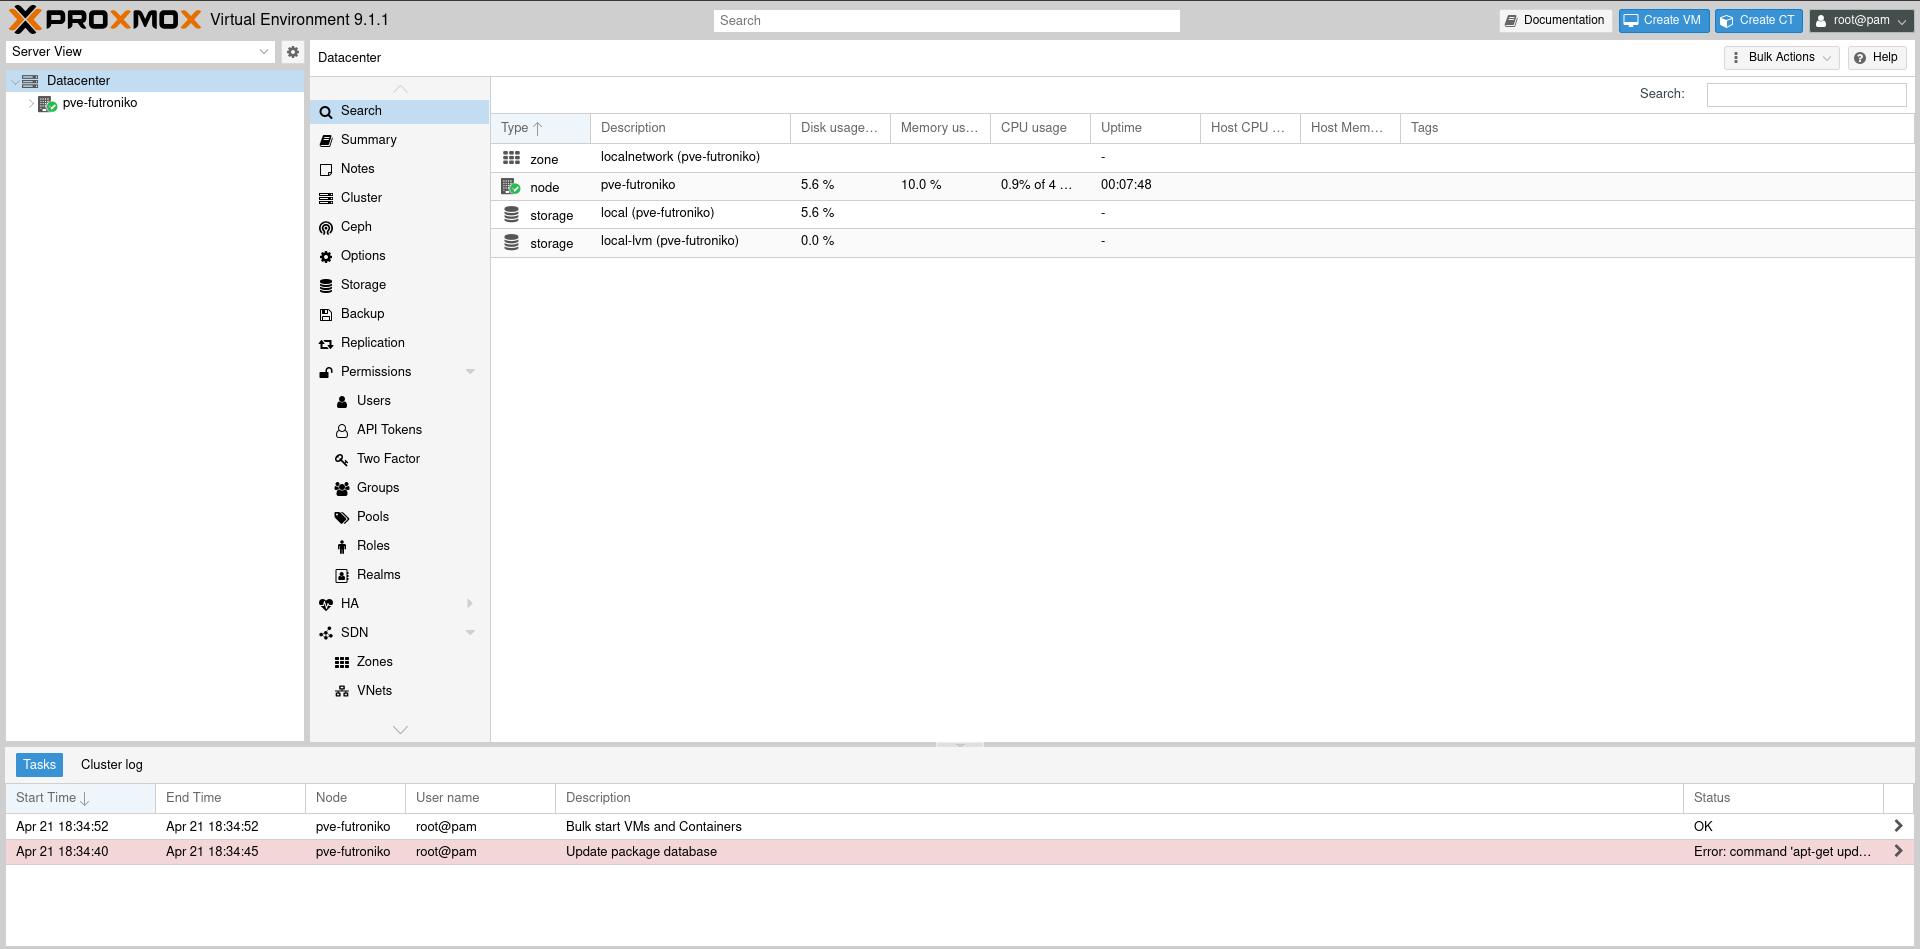
Usage - spinning up an LXC
For manual setup we will do everything in the WebUI of ProxmoxVE. It is very simple. Trust me.
- Download LXC template
From the main screen select Datacenter -> your-node-name -> local (your-node-name). Here find CT Templates
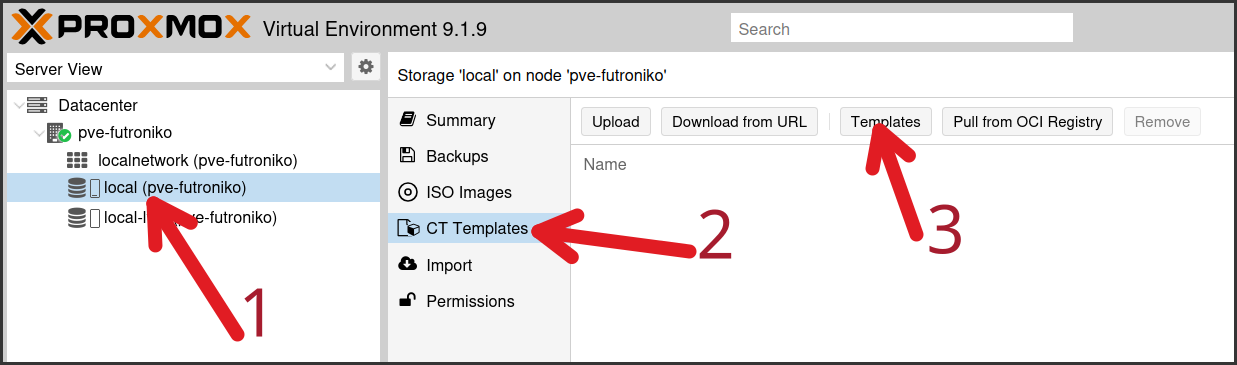
From the list select whatever template interests you - I am choosing ubuntu-24.04-standard. Now let it download.
- Create it
Click [Create CT] in the top right corner of WebUI and you will be greeted with LXC creation screen. Most of the options should be pretty self-explanatory but either way I will let you know what and where I am changing from defaults.
- General
- Hostname: Here I would put my LXC hostname. This time I will make it fun.
- Password: ********
- Confirm password: ********
- Template
- Template: ubuntu-24.04-standard…
- Disks
- CPU
- Memory
- Network
- IPv4/CIDR: 192.168.1.50/24 - so I know where to look for it in case of SSH
- Gateway (IPv4): 192.168.1.1
- DNS
- Confirm
- [Finish]
- Start it
Once it is created select it and click [Start] in the top right corner.
It will spin up the LXC and within a moment you will have access to it via [Console] tab in WebUI or just using SSH.
Terraform
Link: Terraform
Terraform is an infrastructure as code tool that lets you build, change, and version infrastructure safely and efficiently. This includes low-level components like compute instances, storage, and networking; and high-level components like DNS entries and SaaS features.
I mostly use it to set up the basic foundation for my virtual servers on ProxmoxVE, be it linux containers (LXCs) or virtual machines (VMs). After initial setup I switch to Ansible for further configurations. Ansible was covered a bit in previous articles. Be my guest and check those out too!
Setup
Setup for Terraform is pretty simple - just follow the steps described on the provider’s website depending on your operating system.
We will be adding a couple of files to the IAC repository of ours. I wanted to show you some modularity here. That’s why we will take out the LXC definiton template out of the main directory and just refer to it afterwards. Later in time you can prepare similar things for VMs or different flavors of LXCs.
.
├── ansible
│   │
│   ...
│   └── vault
│       └── secrets.yml
├── Makefile
├── scripts
│   └── tf-common.sh
└── terraform
    └── proxmox
        ├── modules
        │   └── lxc
        │       ├── data.tf
        │       ├── main.tf
        │       └── variables.tf
        └── test
            ├── lxc-test.tf
            ├── main.tf
            ├── templates.tf
            ├── terraform.tfvars
            └── variables.tf
LXC directory
# ./terraform/proxmox/modules/lxc/main.tf

# terraform provider - a module that will allow us to talk with ProxmoxVE
terraform {
  required_providers {
    proxmox = {
      source  = "bpg/proxmox"
      version = "0.98.1"
    }
  }
}

# variable that could be helpful along the way
locals {
  repository_root = "${path.module}/../../../.."
}

# the heart - definition of template
resource "proxmox_virtual_environment_container" "template" {
  # proxmox node name
  node_name     = var.target_node
  vm_id         = var.vm_id
  tags          = var.tags
  description   = "${var.hostname}\n Ubuntu. Managed by Terraform."

  started       = true
  start_on_boot = true
  unprivileged  = true
  features {
    nesting = true
  }

  initialization {
    hostname = var.hostname
    ip_config {
      ipv4 {
        address = var.ip
        gateway = var.gateway
      }
    }

    user_account {
      password = "${var.admin_password}"
      keys     = [trimspace(data.local_file.ssh_public_key.content)]
    }
  }

  network_interface {
    name = "eth0"
  }

  operating_system {
    template_file_id = var.template_file_id
    type             = "ubuntu"
  }

  cpu {
    cores = var.cores
  }

  memory {
    dedicated = var.memory
    swap      = var.swap
  }

  disk {
    datastore_id = var.storage
    size         = var.disk_size
  }
}
And since we are using a lot of variables (var.something) we need to declare them
# ./terraform/proxmox/modules/lxc/variables.tf

# Proxmox
## Configuration
variable "target_node" {
  type        = string
  description = "Proxmox node name"
}

variable "vm_id" {
  type        = number
  description = "Proxmox VMID"
}

variable "tags" {
  type        = list(string)
  description = "List of Proxmox tags e.g. [\"iac\", \"control\"]"
  default     = []
}

variable "hostname" {
  type        = string
  description = "LXC hostname"
}

variable "template_file_id" {
  type        = string
  description = "LXC OS template file ID from proxmox_virtual_environment_download_file"
}

variable "admin_password" {
  type        = string
  sensitive   = true
  description = "Admin user password"
}

## Network
variable "ip" {
  type        = string
  description = "Static IP with prefix e.g. 192.168.1.21/24"
}

variable "gateway" {
  type        = string
  description = "Default gateway"
}

## CPU
variable "cores" {
  type    = number
  default = 1
}

## Memory
variable "memory" {
  type    = number
  default = 512
}

variable "swap" {
  type    = number
  default = 512
}

## Storage
variable "storage" {
  type    = string
  default = "local-lvm"
}

variable "disk_size" {
  type        = number
  default     = 8
  description = "Disk size in GB"
}
And lastly - path to private key on your computer or other control node.
# ./terraform/proxmox/modules/lxc/data.tf

data "local_file" "ssh_public_key" {
  filename = pathexpand("~/.ssh/id_ed25519.pub")
}
Main directory
Here we are a little more condensed when it comes to the main.tf file. Everything will be handled by the one in module/lxc.
# ./terraform/proxmox/test/main.tf

terraform {
  required_providers {
    proxmox = {
      source  = "bpg/proxmox"
      version = "0.98.1"
    }
  }
}

provider "proxmox" {
  endpoint  = var.proxmox_api_url
  api_token = "${var.proxmox_token_id}=${var.proxmox_token_secret}"
  insecure  = false
}
But still we need to define our variables.
# ./terraform/proxmox/test/variables.tf

# Proxmox connection
variable "proxmox_node" {
  type        = string
  description = "Proxmox node name"
}

variable "proxmox_api_url" {
  type        = string
  description = "Proxmox API URL"
}

variable "proxmox_token_id" {
  type        = string
  description = "Proxmox API token ID"
}

variable "proxmox_token_secret" {
  type        = string
  sensitive   = true
  description = "Proxmox API token secret"
}

variable "admin_password" {
  type        = string
  sensitive   = true
  description = "Admin user password"
}

# Control plane configuration
variable "hostnames" {
  type = map(string)
  default = {
    lxc_test  = "lxc-iac"
    lxc_vault = "lxc-vault"
  }
}

variable "vm_ids" {
  type = map(number)
  default = {
    lxc_iac   = 200
    lxc_vault = 201
  }
}

variable "tags" {
  type = map(list(string))
  default = {
    lxc_iac   = ["control", "iac", "ansible", "terraform"]
    lxc_vault = ["control", "vault"]
  }
}
If you have some more sensitive variables and / or just don’t want to write them down every time you can create a .tfvars file. I already prepared one for you - just remove the .example part and populate it. :)
# ./terraform/proxmox/test/terraform.tfvars

# Proxmox
## Configuration
proxmox_node = "your_node_name"

## Authentication
proxmox_api_url      = "https://your_address:8006/api2/json"
proxmox_token_id     = "your_token_id"
proxmox_token_secret = "your_token_secret"
We are almost there - let’s create the blueprint for the lxc-test LXC, shall we?
# ./terraform/proxmox/test/lxc-test.tf

module "lxc_test" {
  source = "../modules/lxc"

  vm_id            = var.vm_ids["lxc_test"]
  hostname         = "lxc-test"
  tags             = var.tags["lxc_test"]
  target_node      = var.proxmox_node
  template_file_id = proxmox_virtual_environment_download_file.ubuntu_2404.id
  admin_password   = var.admin_password
  cores            = 1
  memory           = 512
  swap             = 512
  disk_size        = 8
  ip               = "192.168.1.30/24"
  gateway          = "192.168.1.1"
}
As you can see we mentioned the template_file_id. This is becase we will create the LXC from the Template just like during the manual setup. But we don’t want it to be manual. And we want our template to be managed for us too!
# ./terraform/proxmox/test/templates.tf

resource "proxmox_virtual_environment_download_file" "ubuntu_2404" {
  node_name    = var.proxmox_node
  content_type = "vztmpl"
  datastore_id = "local"

  url       = "http://download.proxmox.com/images/system/ubuntu-24.04-standard_24.04-2_amd64.tar.zst"
  file_name = "ubuntu-24.04-standard_24.04-2_amd64.tar.zst"

  overwrite = true
}
Makefile and script
There are two last files to create or edit.
We will create a simple bash script that will take care of extracting the admin password from Ansible Vault and putting it as an environment variable for Terraform to consume. Sounds pretty complicated, but it really isn’t. :)
# ./scripts/tf-common.sh
#!/bin/bash

get_vault_var() {
  ansible-vault view ansible/vault/secrets.yml \
    --vault-password-file ~/.vault_pass \
    | grep -oP "(?<=${1}: \").*(?=\")"
}

export TF_VAR_admin_password="$(get_vault_var "admin_password")"

cd terraform/proxmox/"$1" && terraform "$2" "$3" || exit 1
And now it’s time for the instructions in Makefile.
# ./Makefile
# ...

# Terraform
## Control plane
tf-test-init:
	bash scripts/tf-common.sh test init

tf-test-plan:
	bash scripts/tf-common.sh test plan

tf-test-apply:
	bash scripts/tf-common.sh test apply

tf-test-destroy:
	bash scripts/tf-common.sh test destroy
Automatic LXC provisioning
Off… That was quite the work we did. Hopefully everything works as it should.
Go to the main directory of the homelab configuration and run these commands:
make tf-test-init # initializes the terraform config - MAKE SURE TO RUN IT FIRST
make tf-test-plan # shows you what it plans to do
make tf-test-apply # applies the configurations
make tf-test-destroy # opposite of apply :)
Good work!
Bonus - Traefik config
If you would like to visit your ProxmoxVE instance via a normal looking url be my guest. Here is the little file that you should put in your Traefik config folder. Put your domain name in the rule section and put proper IPs in url one.
Rerun your ansible setup script so it synchronizes with the config and you are done!
But if you have no clue what I am talking about - please read my other article.
# ./ansible/files/traefik/config/proxmox.yml

http:
  routers:
    proxmox:
      entryPoints:
        - websecure
      rule: "Host(`proxmox.example.com`)"
      middlewares:
        - default-headers
        - https-redirect-scheme
      tls: {}
      service: proxmox

  services:
    proxmox:
      loadBalancer:
        servers:
          - url: "https://192.168.1.10:8006"
          # - url: "https://192.168.1.11:8006" # if you would have more nodes :)
        sticky:
          cookie:
            name: "sticky-proxmox-cookie"
You can then also change proxmox_api_url to the same you put in rule in the file here ./terraform/proxmox/test/terraform.tfvars.
Summary
If you are reading this - thank you for spending some time with me. I hope you learned a thing or two.
We were setting up the ProxmoxVE hypervisor on some old hardware and utilizing it with Linux Containers.
This is just the beginning, the door to more opportunities. Seize it!
And most importantly - HAVE FUN!